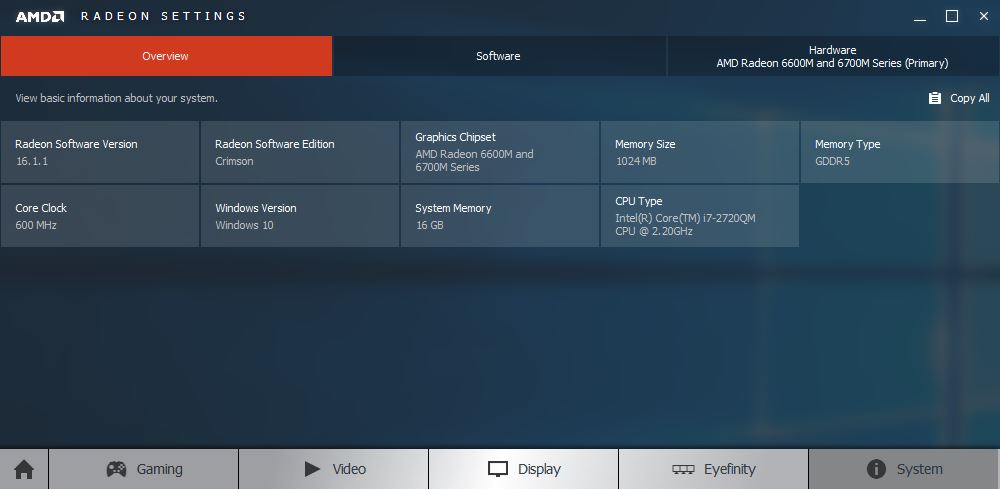
I have an Early 2011 MacBook Pro with a Radeon HD 6750m GPU, it’s the last 17 inch laptop Apple produced & has handled anything I’ve thrown at it. For instance during development for Orcs Must Die! 2 I was running heavy sound design sessions in Ableton Live on OSX, with FMOD Designer and the developer builds of OMD2 under a Parallels VM. It all ran without a hitch and was simply amazing that I could do all that work simultaneously in a single portable DAW / GameDev machine. However, I often boot straight into BootCamp to play & develop games in a native Windows environment which brings me to the Achilles’ heel of this machine… the old BootCamp GPU drivers that rarely receive updates from AMD or Apple.
In this tutorial I’ll show you how to hack support for your Apple flavored AMD GPU into the latest AMD GPU drivers, which at the time of this publication are Crimson Edition 16.1.1 Beta.
Note: I highly recommend you first read the Crimson Edition 16.1.1 Beta Release Notes to verify support for your GPU is included, but it appears to support the AMD Radeon™ HD 5000M & up! Also be advised that attempting any of the following hacks is at your own risk, now let’s get on with it.
1. Download drivers
Download the Crimson Edition 16.1.1 Beta drivers and run the installer. The installation will fail with a message that your hardware is not supported, but it will extract the full installation package to:
C:\AMD\Non-WHQL-64Bit-NIEG-Radeon-Crimson-16.1.1-Win10-Win8.1-Win7-Feb3
Note: All file paths in the next steps will be relative to that folder.
2. Edit InstallManager.cfg
Edit the file “Config\InstallManager.cfg” and add this line to the end of the file:
EnableFalcon=true
This change disables the “unsupported hardware” alert and allows the driver installer to proceed.
3. Find your GPU HardwareID
Right-click the Windows Start Menu icon, click “Device Manager” and navigate to:
Device Manager > Display adapters > Right-click on your GPU > Properties > Details Tab > Property > Hardware Ids

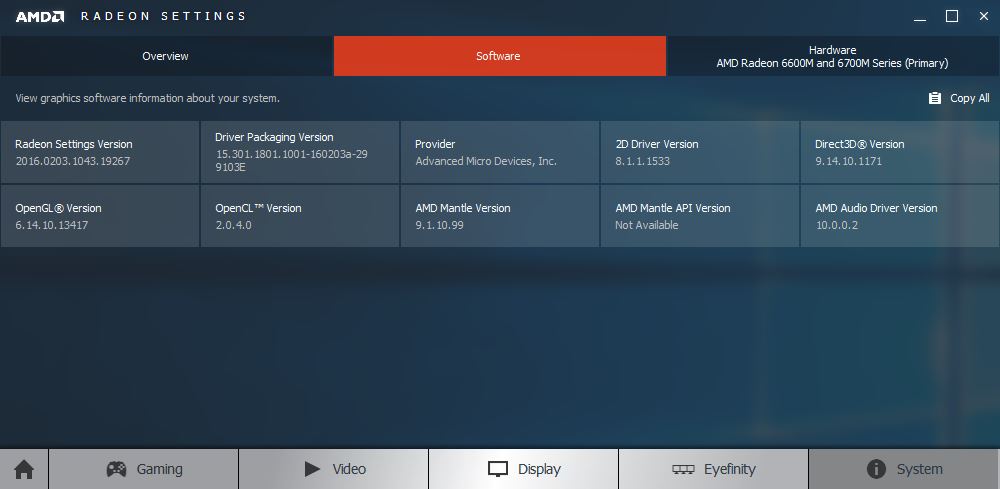
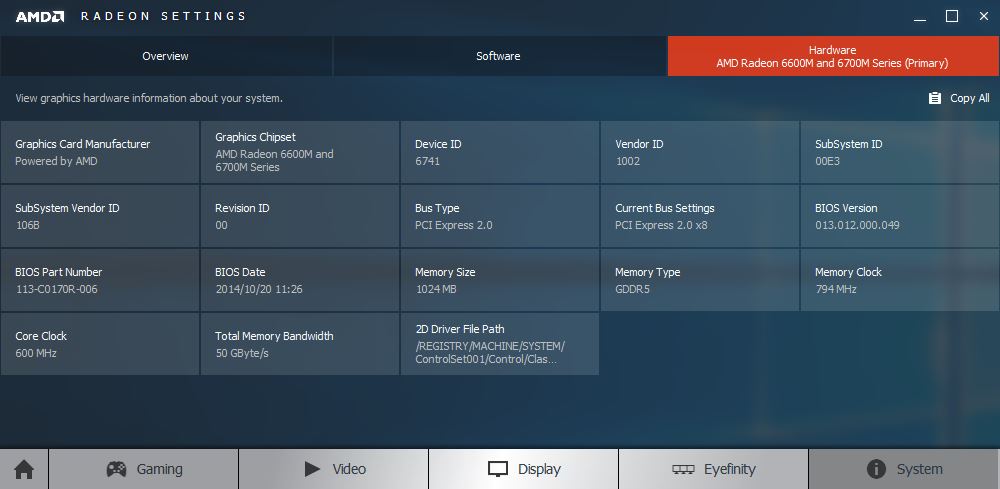
Right-click the top Value to copy it, and paste it in a text editor to save for later. For example the HardwareID of my Apple flavored Radeon HD 6750m is:
PCI\VEN_1002&DEV_6741&SUBSYS_00E3106B&REV_00
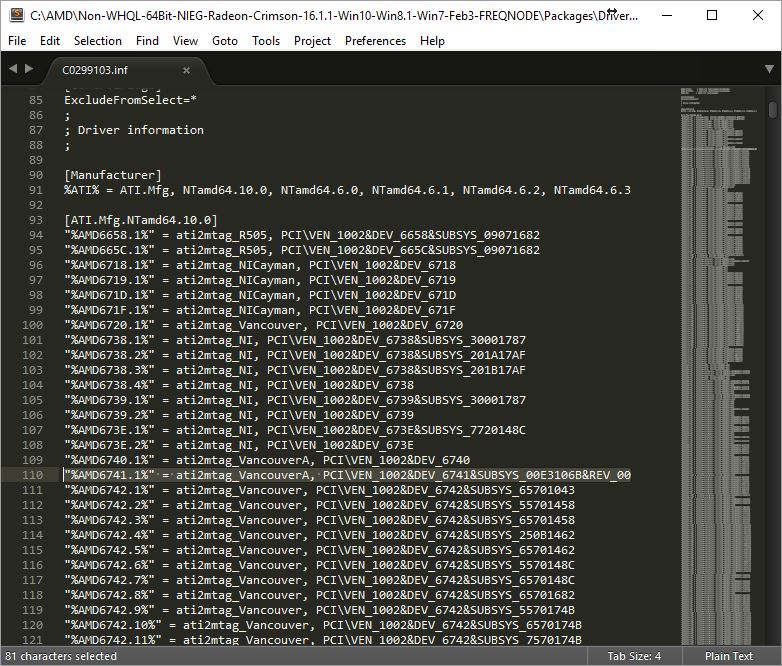
4. Edit INF files
The INF files contain all the information needed to install drivers for your GPU, we will edit them to add support for our Apple/AMD HardwareID.
Navigate to “Packages\Drivers\Display\WT6A_INF” where you will find 3 INF files:
C0299103.inf
C7299103.inf
CU299103.inf
Open each of these INF files and search for a HardwareID similar to yours, and replace it. For example I replaced this line:
"%AMD6741.1%" = ati2mtag_VancouverA, PCI\VEN_1002&DEV_6741
with this:
"%AMD6741.1%" = ati2mtag_VancouverA, PCI\VEN_1002&DEV_6741&SUBSYS_00E3106B&REV_00
If that all went smoothly you can go to step 5, otherwise read on…
Note: If you can’t find a similar HardwareID to replace, try to find your GPU model listed under the section titled “Localizable Strings” in the INF’s. For instance the matching string for my GPU is:
AMD6741.1 = "AMD Radeon 6600M and 6700M Series"
Then take the first value “AMD6741.1” and search for it above where we replaced the HardwareID, and insert yours there.
If you still can’t find a match the driver you downloaded may not support your card at all, but there is one last thing you can try at your own risk if you are confident that your GPU should be supported. Download the latest Apple or AMD BootCamp GPU driver for your machine, inspect the INF files to find your HardwareID, then copy that & the matching “Localizable String” into the driver INF files as new entries. I don’t really recommend doing that but I’m mentioning it for one reason. In the January 30th release of the Crimson Edition 16.1.1 Beta drivers the 6750m was included in the Release Notes as a supported GPU, however it was completely omitted from the INF files and I was able to manually add support with the methods described here. A few days later a February 3rd release of the beta driver was published with the 6750m included, confirming my suspicion that it may have been accidentally omitted in the previous release.
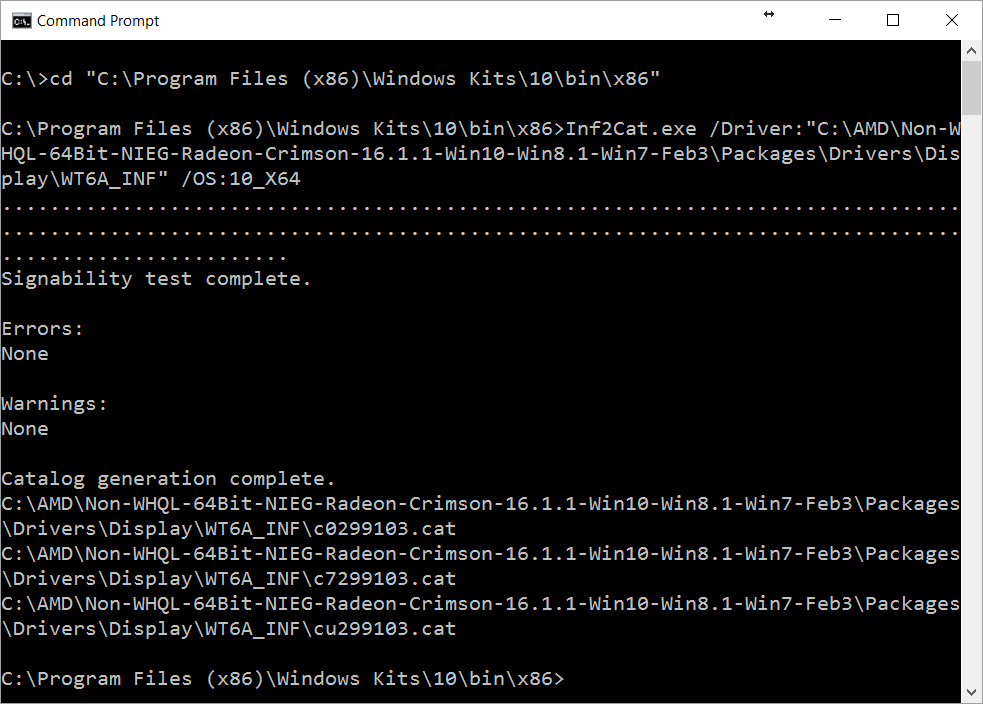
5. Build new CAT files from your modified INF’s
The CAT files contain hashes of INF files and are digitally signed to verify the integrity of the drivers. We need to regenerate the CAT files to reflect the changes we made to the INF’s. This step requires a program called Inf2Cat.exe from the Windows Driver Kit (WDK) 10, so download and install WDK 10 if you don’t already have it. Now you can generate new CAT files with the following commands:
cd "C:\Program Files (x86)\Windows Kits\10\bin\x86"
Inf2Cat.exe /Driver:"C:\AMD\Non-WHQL-64Bit-NIEG-Radeon-Crimson-16.1.1-Win10-Win8.1-Win7-Feb3\Packages\Drivers\Display\WT6A_INF" /OS:10_X64
6. Digitally sign the CAT files
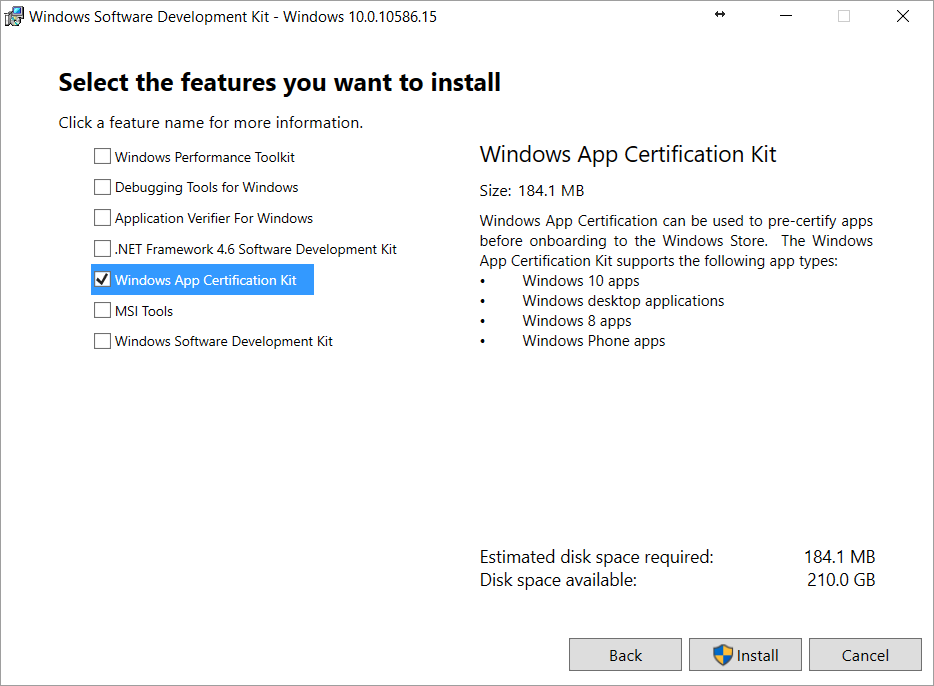
Now we will generate our own digital signature certificate and sign the CAT files in order to comply with Windows 10 driver signature enforcement policy. This tells Windows that our modified driver comes from a trusted source, which in this case is you. The first step is to create your own certificate with the MakeCert tool from the Windows SDK, which you should download and install now. The SDK installer contains many tools but you only need the Windows App Certification Kit to get the MakeCert tool.
To use MakeCert you must open a Command Prompt with the “Run as administrator” option. Right-click the Windows start menu icon, choose “Command Prompt (Admin)” then run the following:
cd "C:\Program Files (x86)\Windows Kits\10\bin\x64"
MakeCert -r -pe -ss PrivateCertStore -n "CN=FreqNode" FreqNode.cer
CertMgr -add FreqNode.cer -s -r localMachine root
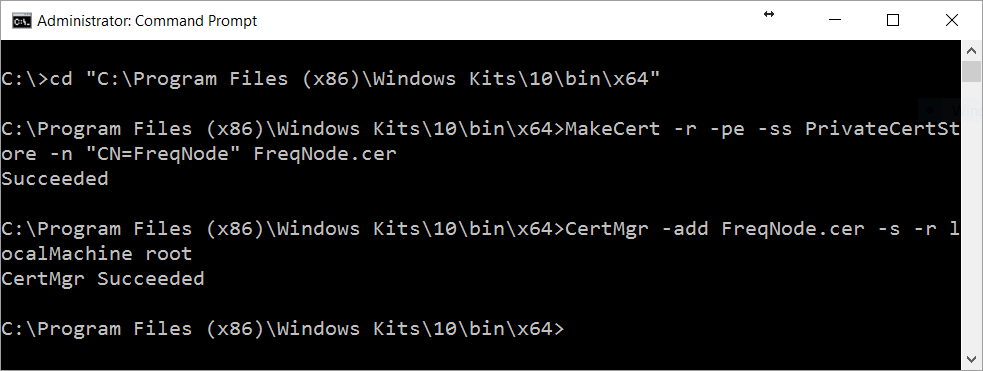
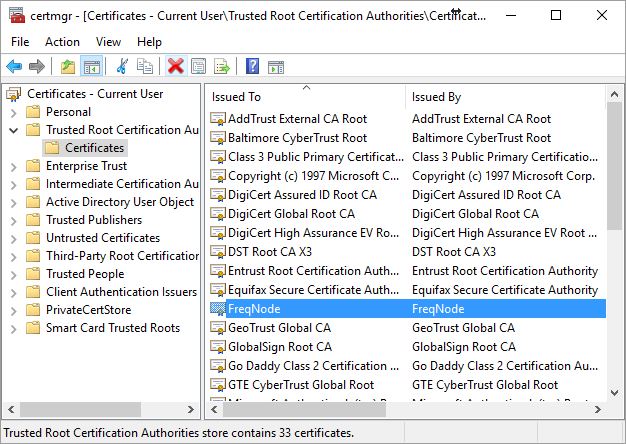
The above MakeCert command creates a cert named “FreqNode” written to a file named “FreqNode.cer” and copies it into your PrivateCertStore, you can name yours whatever you like. Then we run the CertMgr tool to install your new certificate in the Trusted Root Certification Authorities certificate store of your system. You can verify it was installed by opening Certificate Manager… click the Windows Start button, type certmgr.msc into the Search box, and press enter.
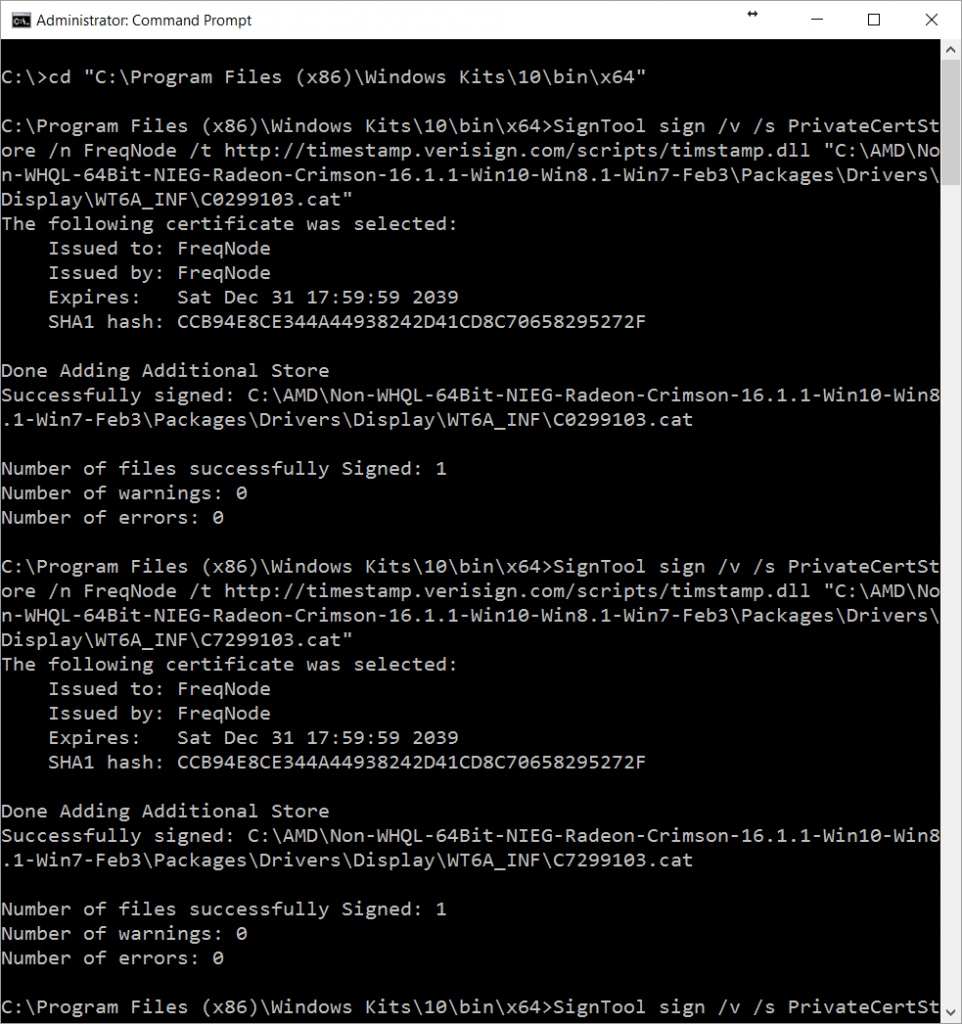
Next we will sign the CAT files with your new cert:
cd "C:\Program Files (x86)\Windows Kits\10\bin\x64"
SignTool sign /v /s PrivateCertStore /n FreqNode /t http://timestamp.verisign.com/scripts/timstamp.dll "C:\AMD\Non-WHQL-64Bit-NIEG-Radeon-Crimson-16.1.1-Win10-Win8.1-Win7-Feb3\Packages\Drivers\Display\WT6A_INF\C0299103.cat"
SignTool sign /v /s PrivateCertStore /n FreqNode /t http://timestamp.verisign.com/scripts/timstamp.dll "C:\AMD\Non-WHQL-64Bit-NIEG-Radeon-Crimson-16.1.1-Win10-Win8.1-Win7-Feb3\Packages\Drivers\Display\WT6A_INF\C7299103.cat"
SignTool sign /v /s PrivateCertStore /n FreqNode /t http://timestamp.verisign.com/scripts/timstamp.dll "C:\AMD\Non-WHQL-64Bit-NIEG-Radeon-Crimson-16.1.1-Win10-Win8.1-Win7-Feb3\Packages\Drivers\Display\WT6A_INF\CU299103.cat"
Great job, we’re almost ready to install our custom drivers but Windows 10 still won’t allow it. The test certificate we generated and signed the drivers with has not been verified by Microsoft, and it won’t be without spending a significant amount of time and money to sign your drivers with a production certificate. In order to get around this, enable the TESTSIGNING Boot Configuration Option:
Bcdedit.exe -set TESTSIGNING ON
Reboot, then run the driver installer:
C:\AMD\Non-WHQL-64Bit-NIEG-Radeon-Crimson-16.1.1-Win10-Win8.1-Win7-Feb3\Setup.exe
You will see a prompt like this with your cert name…
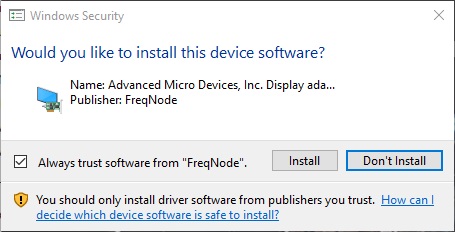
Rad, click Install to proceed then reboot and you’re done!
Caveats:
Since installing this driver I have noticed that my Early 2011 MacBook Pro laptop screen operates at full brightness regardless of the settings. I am working on resolving this issue and will update with any success.
Credits:
Much of the information in this tutorial was derived from Remko Weijnen’s blog post on this subject, and various articles from the Microsoft Developers Network.
Since some of us have the same system as you, is there any possibility of getting a download link of the compiled driver package since I’ve seen way too many people having issues doing all this.
Hi good question, as much as I’d like to provide that here I am not sure what AMD’s stance is on redistributing modified versions of their driver installers. I’ll look into it but I’m pretty sure their license would prohibit it, give me some time to read up on it.
Sorry, redistributing a modified installer is prohibited by the End User License Agreement.
However if you search this page for a comment by James Springle he’s left a link to another website that might help, but I haven’t tried it myself.
I failed to install SDK and because it wasn’t cancelling (it was staying at the bar that says “cancelling please wait” but I waited 30 min and nothing changed) I made the mistake of force quitting it in task manager.. Now I don’t think I’ll be able to install Makecert unless I wipe my pc because the error message that pops up:
“A problem occurred while installing selected Windows SDK components.
Unknown product: {3156336D-8E44-3671-A6FE-AE51D3D6564E}
Parameter name: productCode”
To which I’ve looked around but can’t find a fix.. Is there any way of self signing the CAT files without Makecert?
Hi Greg sorry to hear that, you might find a solution here?
https://social.msdn.microsoft.com/Forums/vstudio/en-US/70aa1c38-f79d-40fb-8c17-54f00e2d7856/cannot-install-windows-sdk-7-and-net-framework-4-unknown-product?forum=vssetup
I don’t know of another way to sign the cert, but you might find the Makecert program included in some other installer.
Hey Brian,
Just wanted to say thank you very much for this tutorial. It helped me successfully install the latest Crimson drivers for my HD6750M on my 15 inch Late 2011 MBP (on first try :D)!
I just had one question, you never mentioned if we can turn test mode off or not after the installation. I haven’t turned it off yet fearing some certificate error will occur, should I go ahead and turn it off now that everything is running well?
Since I’m not willing to pay to get the drivers signed, they won’t crash or anything will they?
Hey Mark, glad you found it helpful! If you disable TestSigning, WIndows will simply revert to using a signed driver compatible with the GPU on the next reboot. The TestSigning mode is required to use any non-certified driver.
Hey Brian,
Thanks for the response. I learnt the answer the hard way (hahaha), but I turned it back on and all is back to normal.
I’m waiting until July 29 (when Microsoft stops shoving Windows 10 down my throat) to clean install Windows 7 again and I’ll use your method once again.
Thank you again for the guide!
Hi Mark I´m desesperated trying to install video drivers in windows 10 in the SAME model than you. Tha audio driver is not working too, but video is more important for me. If you have the compiled driver and could send to someone I´ll thank you very much. Just for testing purposes 🙂
Thanks for the guide. I understood it but prefer to download a modded driver like http://www.mxdriver.com
Hi Steve & good find, the drivers there seem to be updated and released regularly. How has your experience been using them? I may give it a try soon.
It looks like this MX driver is modded to support the AMD FirePro D-series GPU’s. Might work if you have that chip, and that driver was likely created using similar steps that I’ve outlined here. Main point of this tutorial is that it works for older GPU’s as well.
Can I turn off Test Mode and uninstall the Microsoft kits after everything has gone successfully?
Heyo I just answered this in reply to your first question above, thanks for your patience 🙂
just delete the monitor drivers from device manager if you want brightness to get working again.
Hi thanks for the tip! I currently have the ‘Generic PNP Monitor’ driver installed, and right-clicking to uninstall does not seem to make any difference for me. Did you actually have success with this yourself? I would love to hear more details thanks.
Hey great news, I got it working! Instead of choosing ‘Uninstall’ in the right-click menu of the driver I tried ‘Disable’ and now have control of the brightness, thanks for pointing me in the right direction. 😀
lol it’s my bad, I got it disabled but for some reason I said uninstall?? it seems my head wasn’t working properly at the time 🙂
Hi Brian, Thanks for the work you’ve done. Been having an issue with the cmd Prompt Admin not accepting both “Make Cert” and ‘SignTool” being recognised as external or internal cmds.
Any suggestions for a work around?
My machine is an Early 2011 17″ MacBook Pro
I’ve followed all your instructions allowing for changes in *.inf file names.
Further to previous post
now using Developer Command Prompt VS2015
after entering MakeCert
MakeCert -r -pe -ss PrivateCertStore -n “CN=FreqNode” FreqNode.cer
CertMgr -add FreqNode.cer -s -r localMachine root
following error was displayed
Error: WriteFile Failed => 0x5 (5)
Failed
C:|Program Files (x86)|Windows Kits|10|bin|x64>CertMgr -add FreqNode.cer -s -r localMachine root
any ideas
Hi Garry, ‘WriteFile Failed’ errors can happen when running the command without admin privileges. When using MakeCert, make sure you open a Command Prompt with the “Run as administrator” option. Thanks for your comment & I hope this helps you.
I followed these instructions to a T so when they didn’t work I had to go searching for a solution. After many frustrated attempts I found that you left out a crucial step from the site you credited at the end. Namely, you didn’t mention that you have to remove any line which designates the card as excluded in the inf file. I recommend also reversing and simplifying the order of finding where to paste the device ID in the inf file for clarity and ease of use.
If you’re going to largely repost other peoples’ work (albeit credited) it’s probably best to make sure they are complete and accurate. Otherwise, everything else was fine and it’s a great looking site.
Simon, this article is not a repost or reproduction. It documents my research & process to accomplish a goal, start to finish. Each GPU & driver combination is a unique challenge & here I provide the exact procedure to build a driver for the Radeon HD 6750m. Futhermore, in Step 5 of Mr. Weijnen’s article he signs the modified driver with a Kernel-Mode Certificate from DigiCert… which costs $178 per year to obtain. I’ve shown you how to avoid that cost entirely, congratulations.
Together we are all collaborating to support our somewhat abandoned hardware, and I encourage you to keep that spirit in mind when contributing to the conversation.
Thanks for the post. I want to use my 17 inch early 2011 Macbook Pro for old Windows games. Having a hard time getting there! After messing with bootcamp to get Win 7 working I now try to resolve the GPU issue to stop the overheating (I hope this would stop it). While downloadging WDK10 I wanted to ask if this by any chance does even work with Win 7 because I now realised you use Win10.
Hi Brian
Im trying to do this for a long time and i always failed till i saw your note here..
But i still have problems and i will be so thankful if you help me on it..
When im going to download Radeon crimson 16.1.1 beta , its not there in site and its 16.2.1 instead of it….
Can i download that and will that work ??
i tried it and in cmd , i changed all the address in commands , but when i do the command in cmd , this happens :
Signability test complete.
Errors:
None
Warnings :
None
Unable to save the catalog.
signability test failed.
“Pls help me 🙁 “
I gave up now. I tried to update Windows 7 to be able to use the .Net-Framework for signing the files. But the updating process from a fresh new installed Win 7 64bit Professional SP1 (I paid 6 Euros for an OEM key on ebay) takes hours and brings my GPU and CPU temperatures to over 100 degress celcius. I am afraid updating Windows might break my lovely mac. Disgusting.
I did a fresh install of Win 7 and managed to update the drivers like you adviced. Only noticeable difference was that my files have different namens (instead of C0299103.inf it is C0299900.inf). Because of that I could not use the prepared files of Remkos blog post. Thanks for your advice! Although it was fun to do this on a Microsoft machine I do not recognise any difference when playing Sim City 4. This game from 2003 still makes the Macbook Pro 17″ i7 warm. On highest settings rendering is a bit laggy and the new drivers did neithere improve temperatures nor improve the scrolling speed.
Hi Ben, thanks very much for sharing your experience. I agree that heat is the biggest problem with these machines, the newer MacBooks may have more efficient cooling & components but I’ll keep this 17in display any day! Best luck to you friend.
That’s more than seienbls! That’s a great post!
These instructions are missing a crucial step which will likely make them fail on many setups including my 2015 15″ rMBP. This cost me a huge amount of time to figure out what was wrong.
As it turns out you neglected to include a step from the article you largely copied and paraphrased. Namely that you have to remove ExcludeID tag from the relevant AMD information profile.
There were other aspects of these instructions that could be written better. For instance, rather than simply searching for something that “looks like” your device ID, you should find the exact AMD tag by searching for your graphics card’s name in plain text. For instance, a search of “R9 M370X” will reveal my graphics card and its AMD code. You should then search for that code and replace the device ID that looks similar for that code. Then search for the ati2mtag code next to that device ID and remove the exclusion tag as described in the other instructions.
So really the original instructions are better and would likely have helped me install the drivers on my first attempt. If you’re going to reproduce other people’s work you should take care that they are an accurate and complete reproduction.
Simon, this article is not a repost or reproduction. It documents my research & process to accomplish a goal, start to finish. Each GPU & driver combination is a unique challenge & here I provide the exact procedure to build a driver for the Radeon HD 6750m. Futhermore, in Step 5 of Mr. Weijnen’s article he signs the modified driver with a Kernel-Mode Certificate from DigiCert… which costs $178 per year to obtain. I’ve shown you how to avoid that cost entirely, congratulations.
Together we are all collaborating to support our somewhat abandoned hardware, and I encourage you to keep that spirit in mind when contributing to the conversation.
PS: Since you have a newer M370X GPU you’d be better off using the modified drivers shared by Steve in his comment above, http://www.mxdriver.com
Hello Brian,
It is so nice that you shared your experience with us. It helps me a lot.
Unfortunately, When I follow the steps to downloading MakeCert, it turned out that Microsoft no longer provides the software.
As a newbie of this area, I have no idea how to continue.
I am asking if there is any change you could help me, or even email me the driver package you used?
(My mac is 2011mid iMac, GPU: AMD HD 6750M)
Hi Brian
Im trying to do this for a long time and i always failed till i saw your note here..
But i still have problems and i will be so thankful if you help me on it..
When im going to download Radeon crimson 16.1.1 beta , its not there in site and its 16.2.1 instead of it….
Can i download that and will that work ??
i tried it and in cmd , i changed all the address in commands , but when i do the command in cmd , this happens :
Signability test complete.
Errors:
None
Warnings :
None
Unable to save the catalog.
signability test failed.
“Pls help me 🙁 “
I use windows 7 and i guess its the problem , is it possible to do this trick in win7 ?
ive passed step 5 , but now im stucked in SDK app, cause its different in win 7.. is there any way ?
Hi Brian,
Great post! I tried twice your tutorial but it doesn’t work for me. I have a MacBook Pro Late 2011, it works so well since years!
I downloaded Crimson Edition 16.2.1 Beta drivers.
This is my graphic graphic card PCI\VEN_1002&DEV_6740&SUBSYS_00F8106B&REV_00.
I replaced this line “%AMD6740.1%” = ati2mtag_VancouverA, PCI\VEN_1002&DEV_6740 by “%AMD6740.1%” = ati2mtag_VancouverA, PCI\VEN_1002&DEV_6740&SUBSYS_00F8106B&REV_00
I followed every steps without any problems. I disabled Driver Signature Enforcement :
bcdedit.exe -set loadoptions DDISABLE_INTEGRITY_CHECKS
bcdedit.exe -set TESTSIGNING ON
I can see the driver has been successfully installed because I can see frequnode in the details. BUT! The device status is : Windows has stopped this device because it has reported problems. (Code 43). I tried two times the turorial, I uninstall everything and retried.
Now I’m stucked and don’t know what can I do. Any idea?
And the windows update automatically install intel hd 3000 driver which cause a black screen. I have to reboot in safe mode and uninstall the driver. Any idea for this also?
This laptop works so well, it’s just a shame that Apple don’t support Win10 with MacBook Pro 2011! It’s still a great computer!
Thanks.
Hi,
I’ve got the same problem with Code 43 on Windows 10.
Have you figured it out?
I tried installing Windows 8.1 but it changes nothing.
You’re awesome. No, really.
For a long time I had been looking for a better GPU driver than the one that comes with the Apple Bootcamp Support Software, and this article helped tremendously. Lucky for me, I have an early 2011 15″ MBP with the exact same GPU that you have, so most of the instructions were cut-and-paste. The beta driver I downloaded was 6.2.1 instead of 6.1..1, so I needed to do some slight modifications to the file locations and the INF file numbers were different. But once everything came together I installed the modified driver and rebooted the computer.
The big test was playing Final Fantasy XIV. When using the stock driver, the game would auto-detect at Laptop Low, which is pretty basic as far as the graphics go. I could modify some settings in the game but that usually came with a performance hit.. With the modified driver installed, it detected at Laptop High, and everything is gorgeous and the speed is much better. I want to install more games just to see how they look and feel now that I have this new driver LOL.
Thank you so much for taking the time to write this up so people like me could finally have a driver that makes having this computer worthwhile again!
Hi Brian I am stuck at the 4th step. The only inf files i had were CU299900, C7299900 and C0299900. Would it be possible to change the line inside it still?
Hey Calmin you can definitely still change the lines inside the INF file even though the INF file names are different. Keep in mind the new INF file names when going through Step 6 and signing the CAT files. It’s a little tricky but hang in there and you should be good. Hope this helps!
Thank you so much, you save my live, well or my game. Many tanks!!!!!!!!!!!!!!!!
Thank you for this super informative guide. Took some tinkering to make it work with Windows 7 and the 16.2.1 drivers — needed to roll back to .NET 4.0 to in order to install MakeCert before rolling back forward to .NET 4.7 so that I could build new CAT files — but in the end, it all worked out beautifully. Long live Windows 7!
Hi Brian,
I have such a device as well. Luckily, I became aware that there was an extended warranty from apple, I think in 2015, because my system ran too hot. Apple replaced the motherboard, and since then everything was more or less fine with the drivers available. Last Tiuesday’s Win 10 update might have changed something. Since then the graphiccard makes problems, either when I start a specific game or just out of the blue. I am a layman and so far I do not dare to apply your guideline. Do you know any other solution? I have the AMD Radeon series 6600M to 6700M on bootcamp Win 10, MacBookPro 2011. I checked the older drivers on the AMD page, but they do not work either. Any help is appreciated.
Greets Frederik
Hi Frederik I wanted to let you know of a website where you can actually get modified AMD drivers to work with Bootcamp under Windows 10. I’ve been using these for months and have had no issues with them at all. Go to https://www.bootcampdrivers.com/ and head to the “Legacy Drivers” section, where you can download the latest modified drivers. Make sure you follow the directions for removing your old drivers and installing the new ones. If you follow everything correctly, you’ll boot into some really stable drivers and you won’t have to worry about compatibility issues again. Enjoy!
Hi James,
Thank you for your tip. I will check it and let you know if it works for me.
Thank you, James. With the first test everything worked more than fine. That solves an age-old problem, letting me play some games as I used to some years ago.
Cheers, Frederik
hey there! nice article.
Would you mind updating the part after the MakeCert? the command is deprecated!
I think the New-SelfSignedCertificate has taken its place
I have gone up to step 5 (cat2inf)
Then did
Bcdedit.exe -set TESTSIGNING ON –> restart –> installed the driver succesfully
The caveat is that evertime I need to play a game I would need to repeat the last step
Bcdedit.exe -set TESTSIGNING ON –> restart
Amazing work, and can confirm the process above got the 18.x version of the drivers successfully installed on a M295X equipped iMac 5K from a few years ago. I was able to locate MakeCert using a few Google searches, and also solved for the path to some of the other tools just using common sense and reading a few of the comments as well. Removing the “exclude” lines from the .inf was the final piece of the puzzle for the drivers to take. All good and many thanks to all here for contributing!
James thank you. Also @Norman you wrote you made it with Windows 7 — could you elaborate a bit on how to do it? SDK for Win7 downloaded, but I cannot find how to proceed from there
Thank you once again.
PS
Was wandering is this system explained here still better than using mentioned bootcampdrivers.com or (I think older) mxdriver.com?
My family members all the time say that
I am wasting my time here at web, except I know I am getting knowledge all the time by reading
such nice posts.
HI Brian
Thank your the guidelines on how to hack the latest amd gpu but unfortunately nothing changed in my late 2011 macbook pro running windows 10 bootcamp. The display amd adaptor and the high definition audio controller still show that question mark sign. I have followed your instructions step by step and the only differences were: a) path – \AMD\Non-WHQL-Win10-64Bit-Radeon-Software-Crimson-ReLive-16.2.1-Sep20 and b) this one cat file – c0318062.cat. Apart from those differences, setup worked all the way through. The speaker on the bottom right is also crossed out. Any ideas of what could be gone wrong? Many thanks.
i have a 17″ 2011 macbook pro with 6700M and intel integrated graphics.
on my device manager list i see the AMD card has a warning symbol. with the note “windows has stopped this device because it has reported problems”
if i follow this guide, will this clear up problems and enable me to actually use my AMD card? my issue is im wanting to play WoW classic, which on the mac side requires a metal GPU so i install windows 10, however the system requirements need a card with 1gb of vram and the integrated card does not have that, however my 6700M does i just need to be able to use it.
Hi
I’m hoping you could help
You shared a link for Crimson Edition 16.1.1 Beta but it seem AMD have restructured there download interface
how would i track down this driver
SOLUTION: Search for James Springle in THIS comment section and thank the **** out of him <3